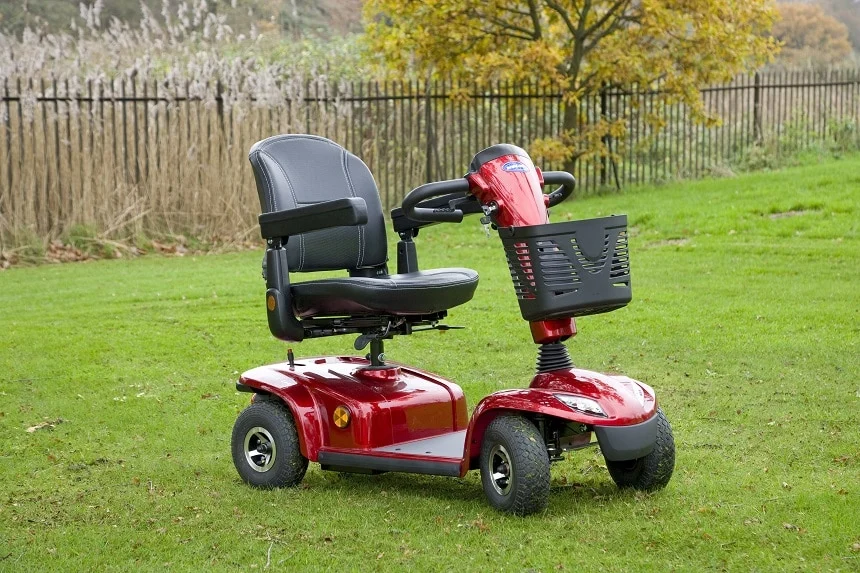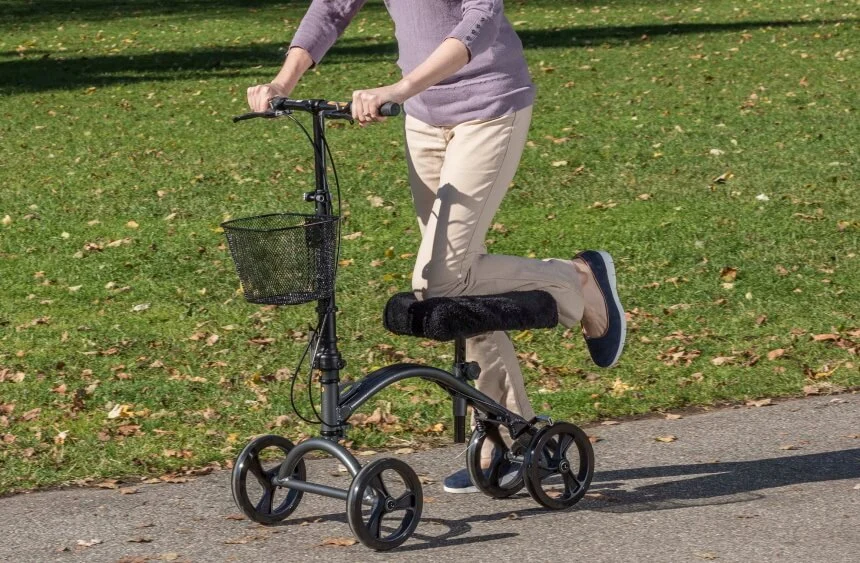
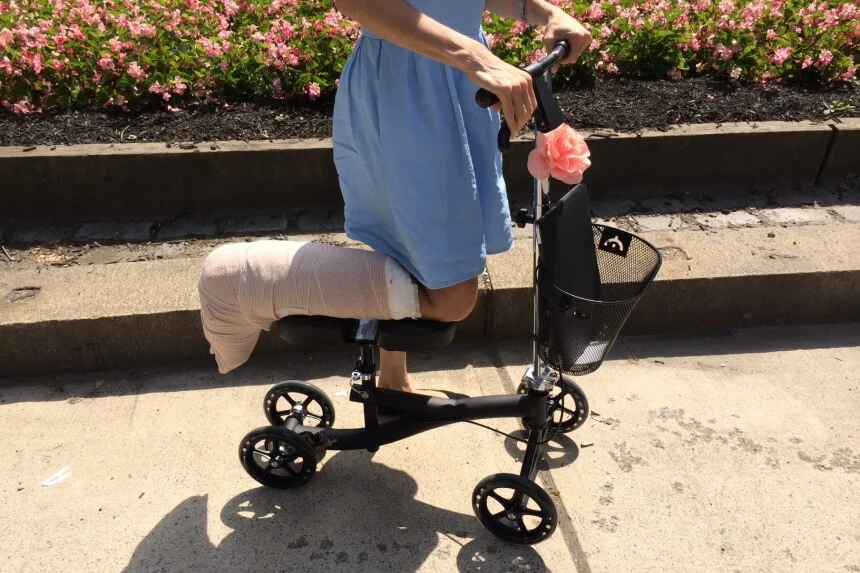
A knee scooter is a wheeled mobility aid designed for people recovering from injuries or surgery below the knee (like a foot or ankle fracture). It’s a modern alternative to crutches, canes, or walkers that enables free and comfortable movement – because let’s face it, no one likes being stuck sitting at home all day. By resting your injured leg on a padded platform and rolling on wheels, a knee scooter helps you get around without bearing weight on the bad leg. Knee scooters serve a different purpose, and our guide to mobility scooters for seniors helps clarify where each mobility aid fits best.
What is a knee scooter used for? Primarily, it’s used to keep weight off a healing foot or ankle while allowing you to move about. Seniors and other adults often find knee scooters more stable and less tiring than crutches, making daily activities easier during recovery. A question we often hear is: “How do you use a knee walker properly?” The basic process is straightforward: place your injured leg on the scooter’s knee pad, hold the handlebars, and push with your good leg to scoot forward. In this updated 2025 guide, we’ll highlight step-by-step instructions, safety tips, and answers to common questions about using a knee scooter so you can stay mobile and independent during your recovery.
(Before using any mobility device, be sure you have your doctor’s approval for weight-bearing status and follow any specific instructions from healthcare providers.)
By Nan J.Corbo | ✅ Reviewed by Ray Butcher |
SeniorFitness is reader-supported. We may earn a commission through products purchased using links on this page. Learn more about our process here
TL;DR: A knee scooter (also known as a knee walker) lets you stay mobile without putting weight on an injured foot or ankle. To use it, adjust the scooter to fit your height (knee bent at 90° on the padded seat, handlebars about waist-level), then rest your injured leg on the pad and push off with your good leg to roll forward. Always lock the brakes when mounting or dismounting, keep both hands on the handlebars, and move at a walking speed. With proper setup and a little practice, you can safely get around your home (and even travel) with a knee scooter, maintaining your independence while you recover.
How Does a Knee Scooter Work?
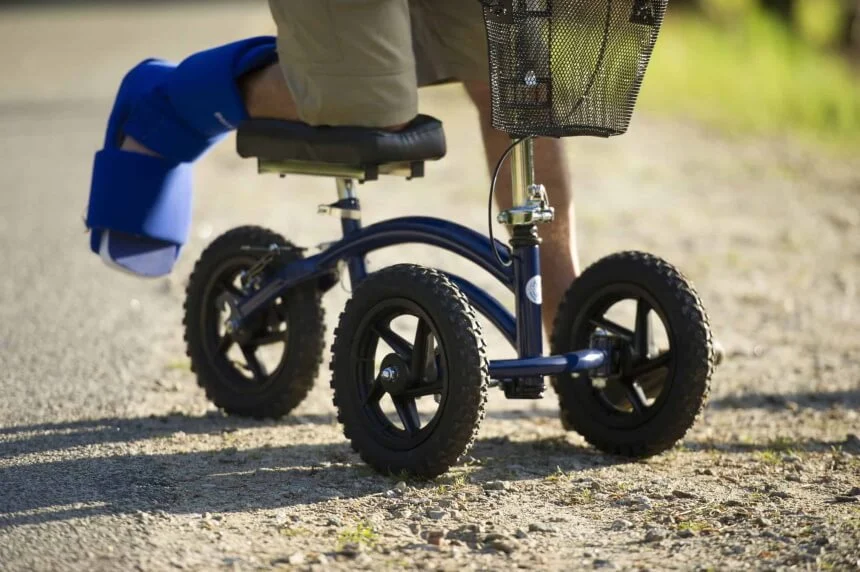
A knee scooter (or knee walker) is a non-motorized wheeled device with either three or four wheels, a steering handlebar, and a padded platform to rest your knee. It works much like a tiny scooter: you stand with one leg on the scooter and use your other (uninjured) leg to propel yourself. The handlebars control your direction and usually include hand brakes for stopping.
Imagine you have a foot or ankle injury and need to run an errand – instead of hopping on crutches, you can place the knee of your injured leg on the scooter’s cushion, keep your weight balanced on your good leg, and roll forward smoothly. The goal is to maximize your mobility while keeping your injured limb completely non-weight-bearing for a safe recovery. The padded knee platform protects your injured leg from pressure, and the handlebars provide stability and control. Most knee scooters have a braking system (similar to bicycle brakes) that allows you to slow down or lock the wheels when needed.
To get started, stand beside the scooter and grip the handlebars. Place your injured leg on the knee pad so your knee is bent about 90°, and your other foot remains on the ground. Ensure the scooter is locked or held steady so it doesn’t roll away during mounting. Once balanced, release the brake and use your good leg to push off gently, gliding forward. Steer the handlebars to turn, and gently squeeze the brake lever when you want to slow down or stop. Tip: When stopping, it’s best to use your good foot to brake by lowering it to the ground, rather than jamming on the hand brake suddenly (which can cause a sudden stop or tipping). The hand brake is very useful for controlling your speed on slopes or preventing the scooter from rolling, but your free leg provides the safest stopping power for normal use.
Key benefits of a Knee Scooter
Knee scooters let you move around without tiring out your arms (as crutches might) and keep your hands free from the constant weight-bearing strain of crutches. They are generally faster and more comfortable for indoor and outdoor use on flat surfaces. According to a 2022 study, 96% of patients recovering from foot/ankle surgery preferred using a knee scooter over crutches Those patients reported a high level of independence and overall satisfaction with the device. However, the same study noted that about 25% of users experienced at least one fall while using a knee scooter – typically due to hitting an obstacle, taking a corner too fast, or going downhill. The takeaway: Knee scooters are an excellent mobility solution for many people, but you must use them carefully. In the next sections, we’ll cover how to choose the right type and size of knee scooter, how to use it step-by-step, and crucial safety practices to avoid accidents.
Types of Knee Scooters: Which One to Get?
While most knee scooters are designed for similar purposes, they are tailored to different lifestyles and environments. We’ve highlighted a few different types of knee scooters below. Choose the option that best suits your needs.
Think about where you’ll use the scooter most. Indoors on tight corners? A three-wheeler could help (if you’re steady). Mostly around the house and grocery store? A four-wheeler offers peace of mind. Planning to go outside on grass? All-terrain wheels are worth it. Need extra support? Heavy-duty models have you covered. And if kneeling is a problem, consider a seated version. The good news is there are many options available in 2025, so you can likely find a knee scooter that fits you and your lifestyle.
Three-Wheel Knee Scooters
Three-wheel knee scooters have one front wheel and two rear wheels. This design is a bit less common but offers a tighter turning radius for improved maneuverability. Pros: With only one wheel in front, you can turn sharper and navigate tight corners more easily than on a four-wheel model. They also tend to be a little lighter and more compact (one less wheel!). Cons: Three-wheel scooters are generally less stable than four-wheelers. The single front wheel can make them more prone to tipping if you turn too quickly or put weight off-center. If you opt for a three-wheeler, be extra cautious with balance and speed, since agility comes at the cost of a bit of stability.
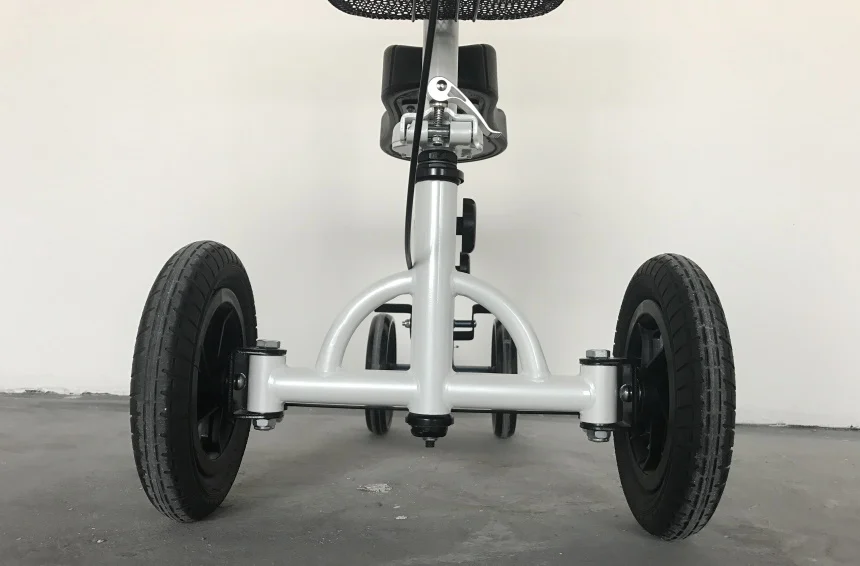
Four-Wheel Knee Scooters
Four-wheel knee scooters are the most common design. They have two front wheels and two rear wheels, providing a stable, even base. Pros: The four-point wheelbase makes them sturdier and less likely to tip side-to-side, which can be reassuring for seniors worried about falls. They track straight and feel balanced. Cons: The trade-off is a wider turning radius – you’ll need a little more space to make a U-turn. Tight corners or narrow hallways might require some multi-point turning. Overall, if stability is your priority (which is often the case for older adults), a four-wheel model is a safe bet.
All-Terrain Knee Scooters
If you plan to spend a lot of time outdoors or on uneven surfaces, an all-terrain knee scooter might be your best friend. These scooters feature larger, wider wheels (sometimes air-filled tires) designed to roll over rough ground like gravel, grass, or dirt paths. Standard knee scooters, by contrast, have smaller hard wheels best suited for smooth floors or pavement. Pros: All-terrain models give you more freedom to go outside – you can take a stroll in the yard or navigate a bumpy driveway more easily. They handle cracks in the sidewalk or small curb drops better than regular wheels. Cons: They can be heavier and bulkier due to the beefier frame and wheels. Also, remember that “all-terrain” has limits – you still need to be very careful on hills, loose surfaces, or wet grass. Even with better wheels, you should avoid very uneven or slippery terrain for safety.
Bariatric Knee Scooters
Bariatric knee scooters are built for higher weight capacities and durability. If you’re a larger individual or you just want an extra-sturdy scooter, look for models labeled “heavy-duty” or “bariatric.” They typically have reinforced frames, stronger shock absorbers, and sometimes a wider knee platform and handlebars for comfort. Pros: These scooters can accommodate higher weight (often 300+ lbs capacity), so you can feel secure that the device will support you. The build quality tends to be very solid. Cons: They might be a bit heavier to lift or transport, and sometimes pricier. Always check the manufacturer’s weight limit and choose a scooter that can comfortably support more than your body weight. For example, most standard knee scooters support around 250–300 lbs, whereas a heavy-duty model may support 350 lbs or more.
Seated Knee Scooters (Hybrid Knee Walker)
A newer variation you might encounter is the seated knee scooter. This device includes a small bicycle-like seat in addition to (or instead of) a knee platform. You actually sit down on the scooter’s seat with your injured leg resting in front of you on a bar or platform. Pros: A seated knee scooter can be helpful if you cannot kneel comfortably on the injured leg. For instance, if bending your knee causes pain or you have a knee injury, the seated scooter lets you keep weight off the leg without putting pressure on your knee joint. It also allows you to take a break and sit if you get tired standing. Cons: These tend to be less common and might be bulkier. You need good balance to use them, and they function a bit more like a traditional mobility scooter (where you propel with your feet or even have a small motor) rather than the classic knee walker motion. Seated knee scooters can be a great alternative for some, but make sure to try one (or consult a professional) to see if it’s suitable for your situation.
Knee Scooter Sizes: Measure Which One You Need
Even though manufacturers provide height ranges, they are subjective because everyone has different leg proportions. The easiest way to know what knee scooter will fit you is by measuring the distance from your knees to the floor.
Before getting started, you’ll need a tape measure, a stable item —like a chair or wall— to balance on, and you’ll need the help of someone else to help you measure. Balance properly and bend your leg to a 90 ° angle. Ensure you’re standing upright and measure the distance between the floor and the bottom of the bent knee.
If your measurement is 16.5″ or more, most knee scooter models will work for you. The Swivelmate Knee Walker is a good option for users with shorter measurements because it goes two inches lower than most models. Furthermore, if your measurement is over 22″, take a look at the Free Spirit Knee Walker.How to Use a Knee Scooter Properly
Here’s how to properly use a knee scooter.
Step 1: Examine and adjust the height of the steering column and the angle of your knee pad, as these can differ depending on the individual.
Step 2: Ensure you lock the hand brakes to prevent the scooter from moving.
Step 3: Put your hands on the handlebars and place your injured leg on the paddle seat while your uninjured leg is on the ground.
Step 4: Let go of the hand brake and propel yourself forward with the leg on the ground. In this step, your primary focus should be on stability.
Step 5: When you want to come to a complete stop, put your weight on the ground with your uninjured leg. Your scooter will come to a complete halt gradually rather than abruptly.
Step 6: To avoid injury or a fall, mount and dismount while the hand brakes are locked.
The video below shows hot to adjust a knee walker for proper use.
Our Best Tips to Use Knee Scooters
Now that your scooter is adjusted to fit you, let’s go through our best tips of using a knee scooter properly. It’s normal to feel a little awkward the first time – take it slow and practice in a safe, open area until you get the hang of it. Here are some our best tips to help you use a knee scooter.
Body Position
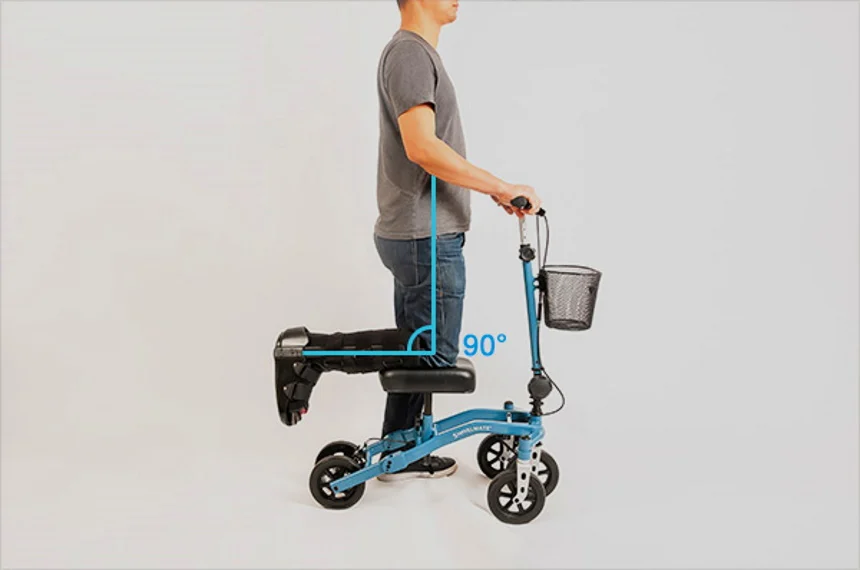
Maintain good posture on your knee scooter. With your injured leg resting on the center of the knee pad, your body should remain upright – avoid leaning too far forward or slouching. Your hips should be level and facing forward. Keep your weight centered over the scooter, not tipping to one side. Your uninjured (supporting) leg should stay straight under you, and the foot should point forward, pushing periodically. Importantly, keep all wheels on the ground as you ride. Don’t try any stunts like wheelies or leaning back on the rear wheels. A stable, centered body position will help prevent falls. If you catch yourself hunching over the handlebars, adjust the height up a bit. If you feel wobbly, slow down and re-center your weight.
Elbow Height
You don’t want stiff, locked arms while using the scooter. Keep a slight bend in your elbows as you hold the handlebars. This flexible stance helps absorb any bumps and makes steering easier. Locking your elbows straight can put strain on your arms, shoulders, and upper back, especially if you hit a bump. Stand upright on your good leg with both hands on the bars, then adjust the handlebar height so that your elbows are comfortably bent (usually around 15-20° bend). This is the ideal ergonomic position. It allows you to steer and brake with control. If you notice tension in your shoulders or arms, check that you’re not reaching too low or high for the handles.
Handlebar Height
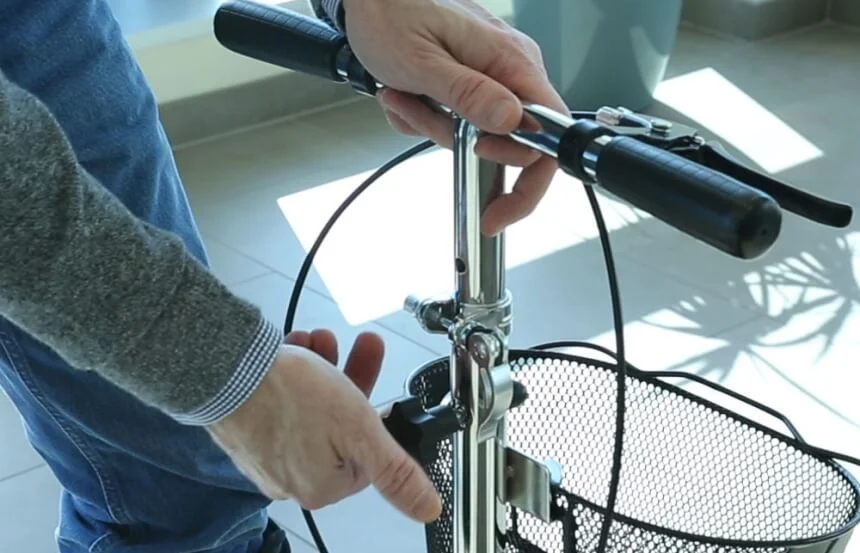
As mentioned earlier, the handlebar should be roughly at waist height when you stand, allowing your arms to be in that gentle bend. If the handlebar is too low, you’ll find yourself stooping over (bad for your back and balance). Too high, and you can’t get good leverage to steer. Adjust it to a neutral, comfortable level. Check the handlebar clamp or lock each time you use the scooter – sometimes folding models have a pin to secure the steering column. Make sure that pin or knob is tight so the handlebar doesn’t suddenly drop while you’re scooting. And always keep both hands on the handlebars while moving. If you need to carry something, use a basket or backpack; don’t try to hold items in one hand, as it can throw off your steering.
Knee Pad Size and Width
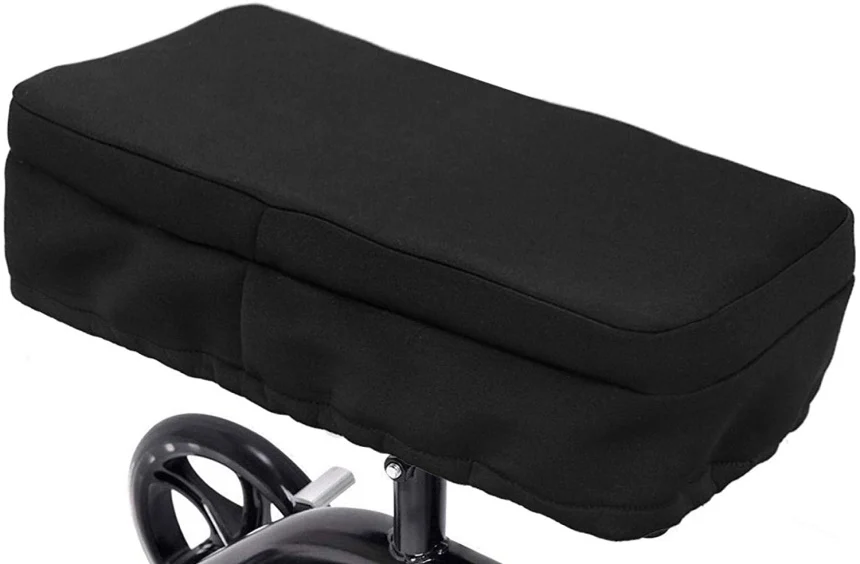
Knee pads (sometimes called the knee platform) are where your injured leg rests, so it needs to be comfortable. Ensure the pad is large enough and cushioned for you. Your knee should fit completely on the pad without parts hanging over the edges. If you have a cast or bulky boot, you might want to add extra padding. Many people buy a knee scooter pad cover (often memory foam or gel) to give a softer cushion and prevent rubbing. This can make a big difference if you’re using the scooter for many weeks. Also, check if the pad’s width or orientation is adjustable – some scooters let you rotate or slide the pad to best support your shin and knee. A proper pad setup will distribute your weight and reduce pressure points. Lastly, as noted, confirm the scooter’s weight capacity – most can hold around 300 lbs safely, but if you’re near that limit, be cautious or consider a heavy-duty model
Before purchasing a knee walker, confirm that the width and size are adjustable because this feature is not always included in lower-cost models.
Knee Wheelchair’s Seat
Underneath the knee pad, there is usually a post or lever that allows you to adjust the knee pad height (sometimes people refer to the pad as the “seat” of the knee scooter). When adjusting this, you might find a safety pin or locking screw that secures the pad’s post Make sure to pull that pin out before trying to raise or lower the knee pad. Set the pad to the right height (as measured earlier), then reinsert the pin fully or tighten the knob to lock the pad in place. You should not see the post wobbling or rotating – it needs to be firmly secured for stability. It’s a good habit to give the pad a little downward push before each use to ensure it’s locked and won’t slip under your weight.
By minding your posture and equipment setup in these ways, you’ll use your knee scooter more effectively and reduce the risk of discomfort or accidents. Listen to your body: if something feels painful or very awkward, stop and readjust the scooter (or talk to a physical therapist for guidance). When properly used, a knee scooter should feel like a natural extension of your body, letting you glide around smoothly while your injured leg rests and heals.
How to Use the Bathroom with a Knee Scooter
Here’s how to use the bathroom with a knee scooter.
- Double-check that everything you need is in the proper place. Ensure your soap, toothpaste, shampoo, and other personal care items should be easily accessible from the shower chair.
- Back up to the shower on the knee scooter so the rear wheels meet the shower’s lip.
- Place your uninjured foot in the shower while keeping your injured knee on the scooter.
- Lean back and sit in the shower seat.
- When finished, turn off the water and open the door carefully; ensure you don’t push the scooter away.
- Pull the scooter up to the shower’s lip.
- Stand in the shower on your uninjured foot, as close to the lip as possible.
- Place your knee on the scooter, then slowly roll away from the shower while lifting your good foot.
- Be cautious of any standing water on the floor!
Showering with a Knee Scooter
If you have a walk-in shower (or a shower-tub combo) and a shower chair or bench, you can use the knee scooter to help you get in and out safely. Here are the steps to shower:
- Prep the bathroom: Double-check that everything you need is within easy reach from your shower chair. This includes soap, shampoo, washcloth, towel, etc. You don’t want to be stretching or standing up to grab items. Have a non-slip mat on the floor and ensure the bathroom floor is dry before you begin.
- Back up to the shower entrance: Approach the shower in reverse. Scoot backwards until the rear wheels of your knee scooter are almost touching the threshold or lip of the shower. (For a tub, back up to it as close as you safely can.) Lock the scooter’s brakes at this point so it stays put.
- Place your good leg inside: With the scooter locked in place, carefully put your uninjured foot into the shower first, over the threshold. Keep your injured knee resting on the scooter’s pad outside the shower.
- Transfer to the shower seat: Hold on to grab bars or edges for stability. Lean your bottom back towards the shower seat or bench, and slowly lower yourself down onto it. Basically, you’re doing a controlled sit-down. Your injured leg will naturally come off the scooter pad as you sit – make sure it ends up elevated or resting comfortably (if it’s a tub, you might swing the scooter away at this point, or if it’s a walk-in, the scooter might stay partly under you). Do not twist sharply; use your arms and good leg to support most of the move.
- Scooter out of the way (if possible): Once seated safely, if there’s room, you or a helper can slide the knee scooter back from the shower opening so it’s not in your way and doesn’t risk rolling. In a walk-in shower, you might be able to pull it just outside the door. In a tub setup, it’s likely already out of the way. Close the shower door or curtain carefully without knocking the scooter.
- Shower safely: Perform your shower as usual while seated. Enjoy getting clean – you deserve it after all this maneuvering! Having a hand-held showerhead can help since you’re seated. Remember to keep your injured leg propped up on a stool or another part of the bench if possible, so it’s not dangling.
How to Use a Knee Scooter on Stairs
One of the most common questions (and concerns) people have is: “Can I use my knee scooter to go up or down stairs?” The short answer is no – not in the way you might hope. You should never attempt to ride a knee scooter on stairs or escalators. Knee scooters are simply not designed for climbing stairs, and trying to do so is extremely dangerous. Here’s what you need to know:
- Avoid stairs entirely with the scooter: If you have a flight of stairs in your home or anywhere you go, plan an alternate way to tackle them. This might mean using crutches or a railing to hop up one step at a time on your good leg, or even sitting on your bottom and scooting up/down while someone carries the scooter for you. It’s not elegant, but it’s far safer. Some people have used makeshift ramps or home stair lifts if available. The key point is, the knee scooter stays off the stairs themselves.
- Why not? A knee scooter on a staircase is a recipe for disaster. The wheels can’t grip the steps, there isn’t enough room on a standard stair for all wheels to stay flat, and balancing on one while tilting up or down is nearly impossible. If you tried to hop it up, the scooter could tip or slip, causing a severe fall. Even descending a single step or curb is risky – the scooter could roll faster than you expect or the wheel could catch, pitching you forward.
- What about a few shallow steps? Occasionally, you might encounter a few wide, shallow steps (like two steps at an entrance). In these rare cases, some people carefully inch up or down with assistance, but it’s still not recommended. If it’s just one low step (like a curb), you could try to dismount the scooter, lift it onto the curb (or have someone lift it), and then step up yourself using your good leg and something for support, then remount. But do not attempt to bump the scooter up while you’re on it.
- Use assistance: If you absolutely must negotiate stairs regularly, talk to your healthcare provider or physical therapist. They might train you on how to manage stairs with crutches (while someone else handles the scooter). Alternatively, see if you can rearrange living spaces to avoid frequent stair use during your recovery (e.g., stay on one floor). Sometimes a home ramp for 1-2 steps at an entryway can be temporarily installed.
In summary, keep the knee scooter on level ground only. Treat stairs as you would a wall – an impassable barrier for the scooter. It’s frustrating to not have full access, but it’s better than taking a tumble. Even one misstep can re-injure your leg (or cause a new injury). As the saying goes, “Two steps on a knee scooter can send you back to square one.” So park it, use another method for the stairs, and then continue scooting happily on the other side. Your safety is worth the extra effort.
How to Use a Knee Scooter with a Boot or a Cast
If you’re wearing a medical boot or a cast, you might be wondering if it’s any different to use the knee scooter. The good news is the basic technique is the same. You will still kneel on the scooter pad with the injured limb. However, there are a few considerations to keep in mind:
- Ensure your cast or boot is well-fitted. Before using the scooter, your cast or walking boot should be properly secured by your doctor or orthopedist. A loose cast or boot could shift around and cause pain or instability as you scoot. If you have a boot, fasten all straps snugly so your foot doesn’t move inside it.
- Pad the knee platform if needed. Casts can be hard and have edges. To avoid digging into the scooter’s knee cushion (and to improve your comfort), you might put a soft towel or cushion on the knee pad. There are also commercial knee pad covers (often fleece or memory foam) that can help distribute pressure. This is especially helpful if the angle of your leg in a cast feels awkward – extra padding can customize the fit.
- Balance changes: A cast or boot can be a bit heavy. You may find the scooter feels slightly different due to the weight distribution. Take it slow at first to adjust. Also, a tall boot might elevate your injured leg a little more, so check that your knee is still bending at 90° and adjust the pad height if necessary.
- Be mindful of the cast/boot’s bulk: When turning or maneuvering, remember that your injured leg is effectively wider or bulkier now. Avoid banging the cast into doorframes or furniture as you pass. Give yourself a little extra clearance on that side. If you have a plaster cast that can crack, you definitely want to avoid hitting it hard against anything.
- Keep it clean and dry: If using the scooter to get around outdoors or in the bathroom, protect your cast or boot. Use a waterproof cover over a cast in wet areas. And be cautious of dirt – if you put your cast down accidentally, clean it off to prevent skin irritation.
- Same safety rules apply: Just because you have a boot doesn’t mean you can try putting weight down – continue to treat that leg as non-weight-bearing unless told otherwise by your doctor. In fact, a boot can give a false sense of security that you could hobble – resist that temptation until cleared.
In essence, using a knee scooter with a cast/boot is pretty much the same process. The biggest difference is making sure you accommodate the cast’s presence – adjust for comfort, keep it safe from getting wet or knocked, and pay extra attention to stability (casts can throw off your balance a tad). Many people actually find a knee scooter more helpful when they have a bulky cast or boot, because it saves them from lugging that weight with crutches. You can glide smoothly instead of dragging the cast around.
One more tip: if you’re allowed to bear slight weight or if your doctor encourages some walking later in recovery, you can often transition between using the scooter and taking a few steps in the boot as needed. But early on, stick with the scooter to give that limb the best chance to heal. Always follow your medical team’s advice on how much to use the injured leg.
Safety Tips
The most serious safety concern with a knee scooter is falling. Falls are a major safety concern, especially for the elderly. Take a look at the following tips for using a knee walker.
- Before using the scooter, ensure that the height is adjusted correctly.
- Before each use, ensure that all pins and clamps are securely fastened.
- Do not use your knee scooter to descend or ascend stairs or escalators.
- Avoid reaching down or to the side of your knee scooter as this can make you fall.
- Always keep all wheels on the ground, and keep your balance in the center.
- Never use the hand brakes to stop the scooter. Always use your standing foot to a stop and use the hand brakes to keep the scooter stationary.
- Always keep both hands on the handlebars while riding. If you need to carry items, invest in a basket for your scooter.
- Do not ride your scooter with a baby or another person on board.
- When using the knee scooter, wear nonslip shoes.
- Take care when rolling to new surfaces. For instance, rolling from a carpet to a tiled floor.
- Don’t go fast or make a sharp turn.
Who Should Not Use a Knee Scooter?
Here’s who shouldn’t use a knee scooter.
- People who have recently had hip or knee surgery shouldn’t use knee scooters. This device is intended for lower foot or ankle injuries.
- Don’t use a knee scooter if both of your feet or ankles are injured. The knee scooter is intended to allow you to use an uninjured foot to move the scooter while resting your injured leg.
- Don’t use a knee scooter if you have difficulty with balance, vision, and coordination. You must be able to safely steer the scooter and maintain your balance.
- If you are intoxicated by drugs or alcohol, don’t use a knee scooter. Avoid anything that impairs your ability to remain balanced and coordinated.
Using a Knee Scooter
A knee scooter can be a game-changer for maintaining your mobility and independence while recovering from a foot or ankle injury. It allows you to perform daily activities – from getting around the house to going out for groceries – without putting weight on your injured limb. By now, you should have a solid understanding of how to choose the right scooter, adjust it to fit you, and use it safely in various scenarios (even tricky ones like bathrooms and travel).
To recap some important points: always set up the scooter correctly (height and brakes), take things slowly at first, and heed all the safety advice (no stairs, no speeding, etc.). Remember that a knee scooter isn’t meant for high speeds or long-distance racing; it’s a recovery aid. Treat it with the same caution you would any medical device. If you follow the guidance in this article, you’ll minimize your risk of accidents. Studies have shown knee scooters are quite safe and very well-liked by patients, as long as they’re used properly. In fact, you might even enjoy zipping around once you get comfortable!
One common question is, “How soon after foot surgery can I start using a knee scooter?” The answer is after your doctor gives the green light. Often you need to wait a couple of weeks post-surgery for swelling to go down and to ensure it’s safe. Always consult with your healthcare provider about timing. They may want you to use crutches initially, then transition to a scooter when your balance is better and any surgical wounds have started healing. Patience in those early days will pay off.
Finally, be kind to yourself during this recovery period. Using a knee scooter does take a bit of coordination, and there’s a learning curve. You might have a few frustrating moments (doorways can be challenging, and carrying coffee while scooting is its own art form!). But many seniors and adults adapt quickly and find that the scooter gives them a new lease on independence during rehab. You’re not stuck on the couch – you can move, do things, maybe even go out to the park for fresh air.
Knee Scooter FAQ‘s
Q: What is a knee scooter used for?
A: A knee scooter is used as a mobility aid for people who cannot put weight on one leg (usually due to foot or ankle injury or surgery). It supports the injured leg on a padded platform and allows the user to roll around with the good leg. In short, it’s an alternative to crutches or wheelchairs to help you stay mobile and independent while recovering from a below-knee injury.
Q: How do I adjust a knee scooter to fit me properly?
A: Adjust the knee platform height so that when your injured leg is resting on it, your knee is bent about 90° and your hips are level. Then adjust the handlebar height to about your waist level or slightly below, so you can stand upright and hold the handles with a slight bend in your elbows. Secure all clamps and pins after adjusting. A properly adjusted scooter will let you stand straight (not hunched over) and control the scooter easily without strain.
Q: How do you use a knee scooter step by step?
A: In brief: 1) Lock the scooter’s brakes and position it next to you. 2) Place your injured leg up on the knee pad and hold the handlebars. 3) Release the brake and use your other leg to gently push off and roll forward. 4) Steer with the handlebars, keeping your weight balanced and both hands on the grips. 5) To stop, put your good foot down or gently squeeze the hand brake while easing weight onto your good leg. 6) Always re-lock the brake before getting off. Practicing this sequence a few times will help you get comfortable.
Q: Can I use a knee scooter if I have a cast or boot on my leg?
A: Yes, you can! A knee scooter works fine with a cast or walking boot. Make sure the cast/boot fits fully on the knee pad (add a cushion if needed for comfort). Be extra careful with balance, as a heavy cast can affect it slightly. Keep the cast or boot dry and clean – for example, use a waterproof cover in the shower (though you won’t take the scooter itself into the shower). Otherwise, the process of using the scooter is the same. Many people with casts prefer knee scooters over crutches for ease of movement.
Q: Are knee scooters safe for seniors?
A: Generally, yes – knee scooters can be very safe for seniors if used correctly. They provide more stability than crutches in many cases. The key is to ensure the senior has the balance and strength to operate it, and that they strictly follow safety guidelines (like avoiding stairs, going slow, using the brake, etc.). It’s also important the scooter is adjusted to their body. Some seniors might need a day or two of practice at home to gain confidence. As always, consult with a doctor or physical therapist to make sure a knee scooter is appropriate for an individual’s health condition.